
To install addons in WoW Forever, locate the client you actually launch, download a file that explicitly supports Forever and place its addon folders inside that client's Interface/AddOns directory. Then fully restart the game and check that the addon loads.
Use our WoW Forever addon selection guide to choose a tool for the job you need. Keep the download page open while installing. It is where you will find the intended game flavor, release notes and required dependencies.
1. Find the selected Forever installation
Select the client or version you use for Forever in Battle.net before locating its files. Blizzard's interface troubleshooting instructions use the cog beside Play, followed by Show in Explorer on Windows or Reveal in Finder on Mac.
Find the folder belonging to that selected client. Avoid copying a path from an old guide without checking it. A machine with several WoW clients can contain several Interface directories, and a correctly extracted addon in the wrong one will not appear in your Forever session.
Keep a note of the location if your addon manager detects several installations. Check its selected instance against the client you opened from Battle.net.
2. Choose a supported package
Use the developer's project page or release listing. On a file page, inspect the Forever flavor and supported game version. For example, Leatrix Plus's Forever file explicitly lists Forever 1.60.1.
Read any dependency instructions before downloading. A project may package its required components together or distribute them separately. The Questie release listing identifies both Questie and QuestieDB, so checking only one component can leave the installation incomplete.
An addon manager should also be set to the correct game instance. A generic project's main Download button may point at another WoW flavor; the file details are the more useful check.
3. Check the extracted folder depth
Close the game before replacing addon files. Extract the package and examine the contents before copying them.
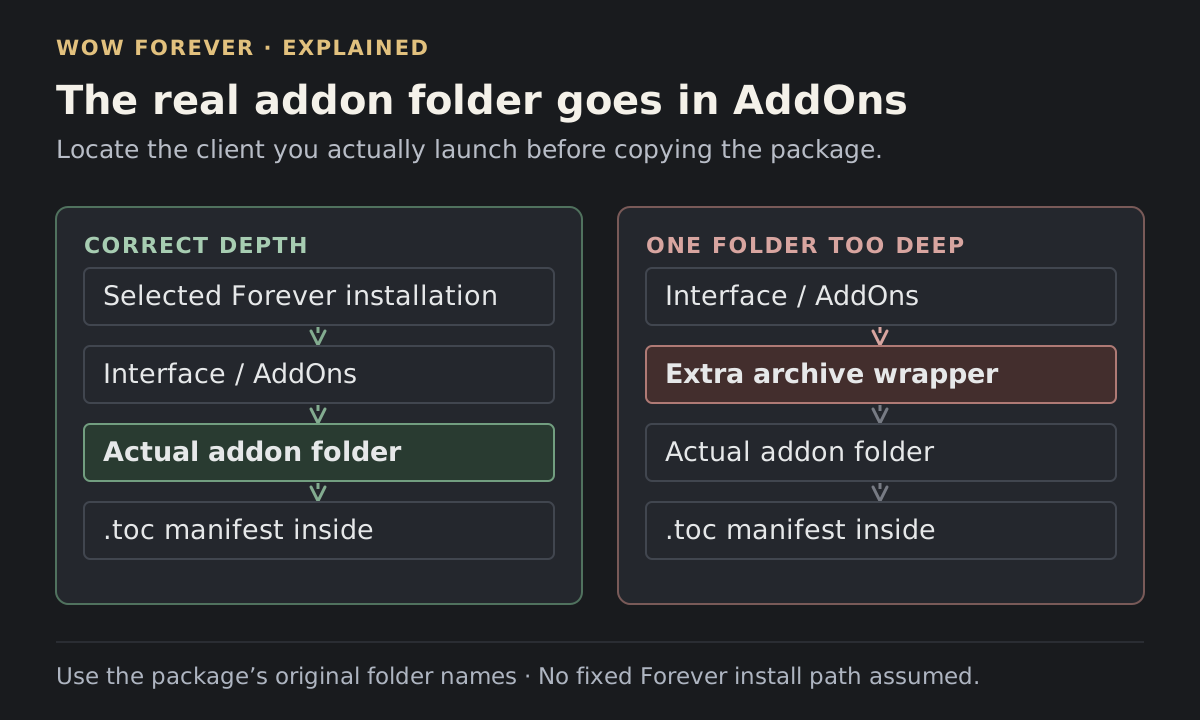
The actual addon directory belongs directly inside AddOns. Its manifest, a file ending in .toc, should be inside that directory. Some packages legitimately contain several addon directories; retain the components supplied by the developer.
A common mistake is copying the ZIP's outer container so the real addon ends up one folder too deep. The Questie installation guide illustrates this nesting problem. Its Classic-specific path examples should not be substituted for your selected Forever location.
Use the release package's folder names. Avoid keeping an older copy beside a renamed newer copy while trying to diagnose loading.
 Enlarge
4. Restart and verify
Fully close and reopen the client after adding the files. Inspect the in-game AddOns list and the component's enabled state, then log in and open the addon's settings or documented command.
Make one small, recognizable change. For a map addon, check the map; for a quest addon, compare its display with a quest already in your log. This checks the feature you installed, rather than merely proving that files exist on disk.
If the addon is missing or has no visible effect
| What you see | Check next |
|---|---|
| No entry in the AddOns list | Client location, extracted folder depth and a full restart |
| An entry reporting a dependency problem | The developer's required components and versions |
| The addon loads but its window is absent | Its opening command, enabled features and selected profile |
| The problem appears after adding another addon | Test the affected addon with its dependencies alone |
Record the client build, addon version and exact error text before asking the author for help. Include whether the addon appears in the list and whether the problem remains with other addons disabled.